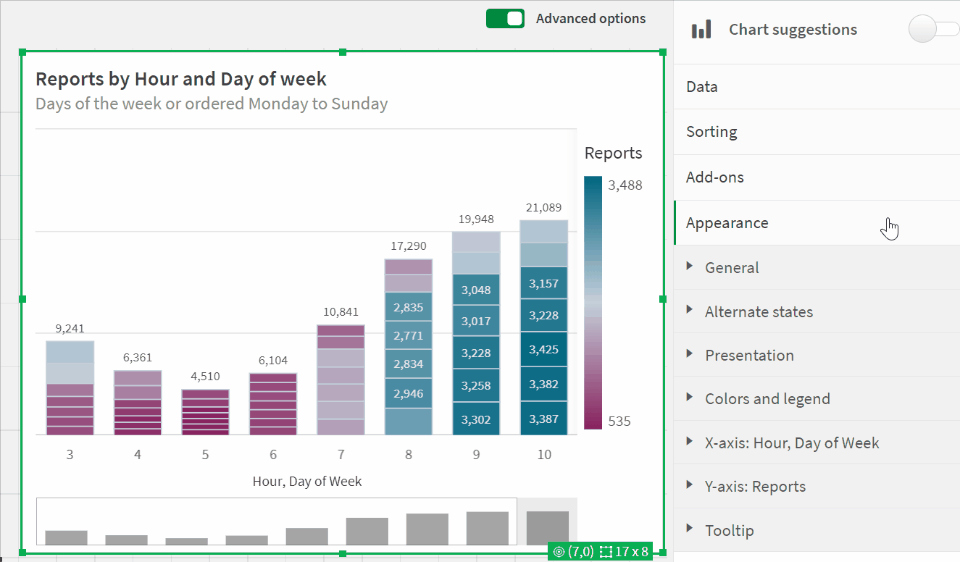
The latest update to Qlik Cloud includes some great updates, continuing the trend of getting more styling options, something I’ve always wanted more of. This update gives up font family, size, and color for bar chart axes — see a quick glance at the updates in this GIF:
One of my biggest annoyances when it comes to cleaning data is needing to make a transformation that is seemingly super easy but turns out to be much more involved when it comes time to implement. I’ve found that while Qlik is not immune to these scenarios, you can very often script your way to a solution.
One of these common snafus is having to unpivot a table. Or…pivot it? Perhaps un-unpivot?
Let’s look at an example of how to pivot and then unpivot a table using Qlik script.
The Example
I first create a new app in Qlik Sense SaaS (though this all works exactly the same if using Qlik Sense on-prem). I am going to pull in the Raleigh Police Incidents (NIBRS) dataset, provided freely to the public via the city’s ArcGIS Open Data portal; here’s the link to the data:
Here’s our load script to bring in the table from a CSV file:
Notice the fields on lines 16-20 that begin with “reported” — these appear to be the same date field but with slightly different formats and granularity. Let’s check it out:
Just as we suspected. Now, what if we wanted to pivot (or “transpose”) those fields into just two fields: one for the field names and one for the field values? This can be done in either the Data Manager or the Data Load Editor. When scripting in the load editor, we use the Crosstable() function.
To do this, I’m going to choose to do this pivot with only the date fields and the unique ID field, which in this case is the [OBJECTID] field:
Our crosstable load looks like this:
This screenshot shows that, on lines 3-9, we are loading our key and date fields from the [Data] table we already loaded in. Then, on line 2, we use the Crosstable prefix and include 3 parameters:
[Date Field] is the field that will be created to hold the field names that appear on lines 4-9.
[Date Value] is the field that will be created to hold the field values from the fields on lines 4-9.
1 indicates that I only want to pivot the date fields around the first loaded field in this table, which is [OBJECTID] in this case. If this was 2, for example, then this operation would pivot the table around [OBJECTID] and [reported_date].
When we run this script, Qlik first loads the data from the CSV into the [Data] table, and then pivots (“crosstables”) the date fields around the key field, [OBJECTID], into a new table called [Dates].
We now see why we did this operation in a separate table and did not include all of the other fields – the pivot predictably increases the number of rows the app is now using:
Here’s what we now have:
Notice how the [Date Field] now holds all of those column names and the [Date Value] field now has those column values. We have successfully turned this:
…into this:
But what if our data had started out in a “pivoted” format? Or what if we want to simply unpivot that data?
The Solution
In order to unpivot the table, we’ll use a Generic Load and some clever scripting.
First, I’ll write the Generic Load:
This screenshot shows that I am using the [OBJECTID] field as my key, [Date Field] as the field names (“attributes”; these will be turned into separate columns), and [Date Value] as the field values (these will become the values for those separate columns).
Here’s the resulting schema:
We now have our data back in the column/value orientation we want, but we have an annoying issue: the resulting tables don’t auto-concatenate. We instead get a separate table for each unpivoted field.
Let’s write some script to always join these tables together without having to write a separate JOIN statement for each table:
Each line of this script is doing the following:
This line creates a new empty table called [Un-unpivoted] with only our key field, [OBJECTID].
*blank*
This line begins a For loop that starts with the number of loaded tables in our app up to this point (NoOfTables()-1) and then decrements (step -1) down to zero (to 0).
Here, inside the For loop, we set the variable vCurrentTable to the table name of the current loaded table index. This just means that every table loaded into the app at this point can be identified by the index at which they were loaded or joined. The first table loaded is 0, the next one is 1, etc. This order changes if that first table is joined with another table later on, though.
*blank*
Here, we check to see if the current table name begins with “Unpivoted.”, which is what our Generic Load tables are prepended with.
If the current table indeed begins with “Unpivoted.”, then we Resident the table with all of its fields and join it to the [Un-unpivoted] we created on line 1.
Now that we’ve joined our table into our master [Un-unpivoted] table, we can drop it from our data model.
This ends our IF statement.
This takes us to the next table index.
Here’s a table that shows the operations for each iteration:
Once we run this, we can see in the resulting table that we were successful!
If there’s one thing I’ve learned in my time using, learning, and teaching about Qlik Sense, it’s that there’s so much I’ve used but haven’t fully memorized. This is the case with Qlik script functions, section access formatting, QRS API, and plenty more. Since I’m always Googling and looking things up on the Qlik Help site, I decided to maximize my efficiency with some Google Chrome shortcuts.
Before, my searching workflow was to open a new Chrome tab, navigate to the Qlik Help search page, and then run my search from there. Not that arduous or time-consuming, but we can get faster!
Now, from the Chrome search bar (officially called the “Omnibox”), I can start my query with :q and then enter my search keywords. When I hit enter, I’m taken directly to the Qlik Help search results for those keywords!
Here’s how to do it:
Go to the browser settings and then go to the Search engine section.
Select the Manage search engines and site search option and then find the section called Site search.
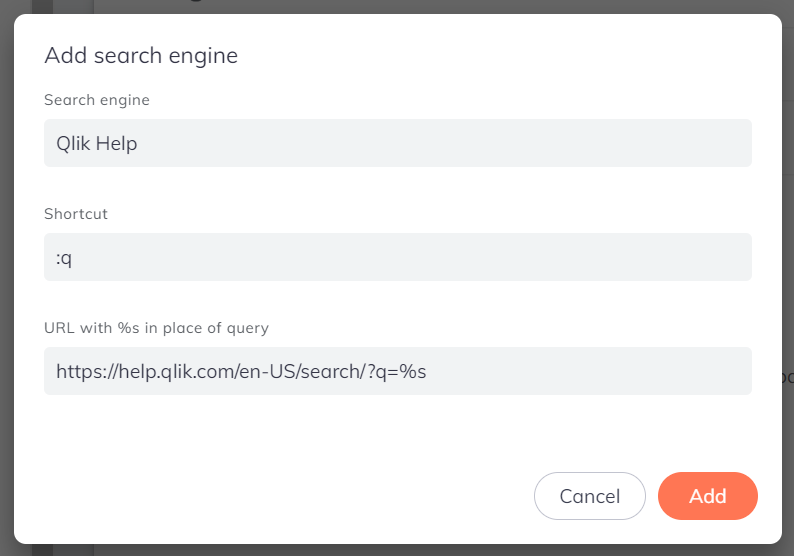
Select the Add button and then fill in the boxes like this:
Search Engine: Qlik Help
Shortcut: :q
URL with %s in place of query: https://help.qlik.com/en-US/search/?q=%s
Note that if you get an error about the shortcut being invalid, you may have another search engine shortcut that’s already using the :q shortcut. Click the Cancel button and check the list of search engines above this section. If there’s a conflicting one, you can edit it or delete it:
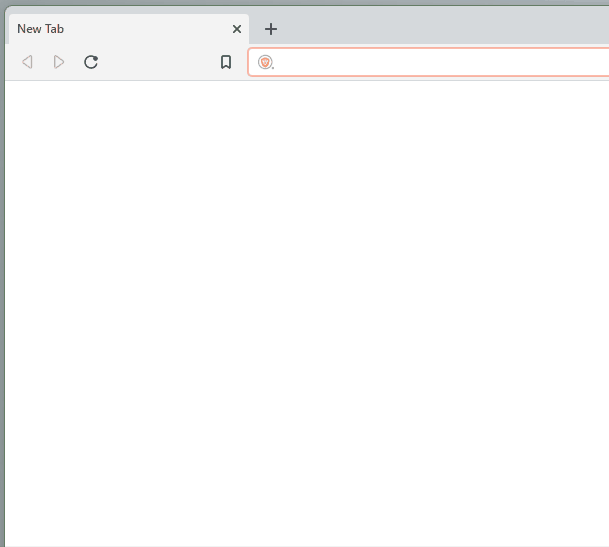
Once you successfully add the Qlik Help shortcut, you can try it by opening a new tab, clicking into the browser search bar, typing “:q”, hitting the space bar, typing your search keywords, and then hitting the Enter key on your keyboard:
We’re getting pretty efficient over here! Let’s use another keyboard shortcut to really kick things into high gear: CTRL + L. Use that keyboard shortcut to focus your cursor to the browser search bar without having to click into it first:
Okay…but what if we were really in a hurry to get our Qlik Help fix? Let’s add a final keyboard shortcut to the mix here: ALT + ENTER. This shortcut will open the search results in a new tab for us so that we don’t have to navigate away from our current page:
Arc Analytics is a full-service data analytics and integration consultancy based in Charlotte, NC, USA, specializing in the Qlik platform. Browse the posts below for practical Qlik tips, migration guidance, and real-world use cases from our consulting work.